Here is how to design a Facebook Cover.
First, you want to make a template in Adobe Photoshop to indicate where key items will overlay on the image.
I then cropped it tighter to only the 851 pixel by 315 pixel window of the cover shot.
In this case the name is in black text. But for layout purposes it needs to be white text. I have saved it as PNG file. PNG files keep areas that have no information blank instead of white.
You can right click here and save the PNG file as a template for your use.
I then import the PNG into Adobe Lightroom.
In the Library Module to to View/Loupe Overlay:
Click on Show and Layout image then Choose Layout Image.
This will load the template.
Now find an image you think will work. Make a duplicate copy (Command ' ).
Go to the develop module (D).
Go to the crop tool (R).
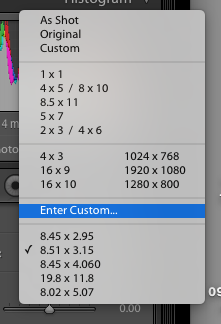
Click on "Enter Custom."
Enter Facebook's required size of 815 Pixels by 315 Pixels.
This will now crop the image to this size.
Go back to the Library Module (L) and see how the overlay looks with this crop.
You may need to go back to the crop tool to adjust the cropping. In my case I moved the image up a little bit so my name was not running into the white table.
Now export the file as JPG.
Import into Facebook. Congratulations you now have a new Facebook Cover!


